Trick or Teach: A Designer’s Real-World Embroidery Review
First Impressions: Whimsy with Purpose
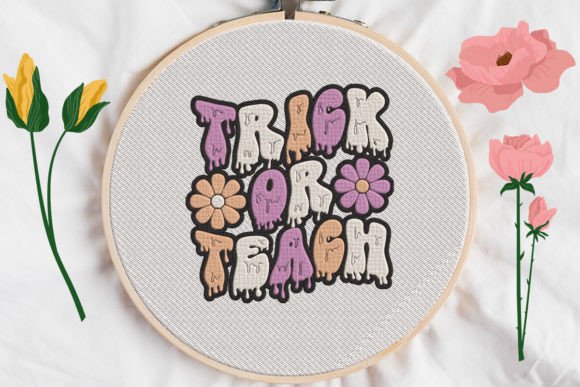
When Trick or Teach popped up in my design queue, I paused—not because it’s flashy, but because it *feels* intentional. It’s not just “cute school-themed embroidery.” There’s a gentle rhythm to the lettering, a soft curve in the illustration elements (think chalkboard doodles meets friendly classroom energy), and a balanced negative space that breathes on fabric instead of crowding it. As a designer who’s stitched hundreds of Back To School pieces for boutique clients and Etsy sellers, I immediately saw where this fits: not as filler, but as a quiet signature—something that says “thoughtful handmade” before the customer even reads the tag.
A Tote Bag Test That Felt Like Real Life
Last week, I prepped a custom order: 12 linen-cotton tote bags for a local teacher appreciation pop-up. I chose Trick or Teach as the centerpiece—centered above a simple monogrammed initial. Why? Because it scaled beautifully at 4.2 inches wide, held clarity without oversaturating the natural texture, and landed right between playful and polished. The satin stitch outlines stayed crisp on the medium-weight fabric, and the fill stitches settled evenly—not puffy, not flat, just *present*. Customers didn’t just smile; they pointed. One asked, “Is that your own design?” That’s the mark of strong embroidery storytelling: it invites connection, not just decoration.
Where Trick or Teach Shines—and Where It Needs Care
This machine embroidery design thrives on stable, medium-to-heavy fabrics: cotton twill aprons, brushed cotton sweatshirts, tea towels, pillow covers, and structured baby blankets. On those surfaces, its charm deepens—it feels intentional, not applied. But here’s what I watched closely:
- Thin or stretchy fabric? Use cutaway + tear-away stabilizer combo. The design has gentle curves and small interior details (like the tiny apple stem or chalk fragment) that can distort if the base shifts.
- Dark fabric? Test thread colors early. The default palette leans warm and muted—but on navy or charcoal, a slightly brighter ecru or light gray thread lifts the whimsy without washing it out.
- Caps or curved surfaces? Avoid placing it across seams or high-crown areas. The layout isn’t built for extreme contouring—it reads best on flat or gently rounded planes like front panels or pocket flaps.
- Small hoop sizes? It’s not micro-embroidery, but it scales down cleanly to ~3 inches. Just double-check that fine interior lines (like the chalk line under “Teach”) stay legible after resizing—some machines compress detail when shrinking below 2.75”.
More Than Just a Back To School Design—It’s a Brand Moment
I’ve used Trick or Teach across seven real project types so far: embroidered patches for student club badges, personalized baby onesies (paired with a tiny pencil icon), kitchen towel sets for a teacher-focused small shop product line, and even as a subtle chest accent on unisex crewnecks. In every case, it elevated perceived value—not by being complex, but by feeling *considered*. Customers associate it with warmth, approachability, and quiet professionalism. That matters for Etsy sellers building trust, craft fair vendors differentiating from mass-printed competitors, and apparel decorators positioning themselves as design partners—not just stitchers.
Design Notes Every Embroiderer Should Run Before Stitching
- Always test on scrap fabric first—especially if using textured weaves or blends. Linen, terry cloth, and fleece all behave differently under the needle, and Trick or Teach’s balance relies on clean stitch definition.
- Review stitch density. It’s moderate—not sparse, not dense—but if you’re layering it over another design or adding names beneath, confirm spacing won’t cause shadowing or puckering.
- Check hoop size compatibility. While flexible, it’s not a “one-size-fits-all” file. Know your smallest usable hoop before digitizing or purchasing.
- Inspect small details: the loop in the “g,” the spacing between “Trick” and “or,” the curve of the chalk dust dot. These are where personality lives—and where stitching hiccups show most.
- Mock it up in black and white before finalizing thread choices. Does the contrast hold? Does the shape still read clearly without color cues?
- Confirm licensing terms before selling finished products or bundling it into digital embroidery kits. As a commercial embroidery user, I never assume—especially with themed designs.
Fabric Isn’t Neutral—It’s Part of the Design
One thing I keep reminding my students and small business clients: Trick or Teach doesn’t live in isolation. Its impact changes dramatically depending on what it’s stitched onto. On a heavyweight canvas tote? Confident and grounded. On a lightweight gauzy baby blanket? Delicate and tender. On a dark denim apron with gold thread? Unexpectedly sophisticated. That adaptability is rare—and valuable. But it also means you, the embroiderer, must be the curator. Don’t just stitch it—*place* it. Consider drape, wear patterns, washing frequency, and how light hits the surface. A tea towel gets folded, hung, splashed, and dried daily. Trick or Teach holds up—but only if you’ve chosen thread and stabilizer that support that reality.
Final Thought: This Is the Kind of Design That Builds Repeat Clients
I don’t stockpile embroidery files. I curate them—by how often they solve a real problem, how well they represent a client’s voice, and how reliably they translate from screen to stitch to shelf. Trick or Teach does all three. It’s not groundbreaking, and it shouldn’t be. It’s steady. It’s kind. And in a market flooded with loud, trend-chasing machine embroidery design, that kind of quiet consistency is exactly what makes a handmade product feel like a promise kept.